
In a previous post we’ve seen a Universal Programmer TOPWIN which is capable of programming 8051,PIC,AVR,EEPROM ,EPROM,etc.. But the main problem with TOPWIN is its incompatibility with 64 bit Operating System & Windows 8 .
In this post we shall review an excellent Universal programmer MINIPRO 866 from AUTOELECTRIC Co. that works on all platforms including 32/64 bit Windows 8 .

Two models are available MINIPRO 866 CS & MINIPRO 866 A.
The 866 A has an additional advantage of ICSP – In Circuit Serial Programming – a real awesome support for ON board programming of SMD chips.
ICSP now supports ATMEL89S51,52, ATMEGA- AVR whole series and MICROCHIP PIC10F, 12F, 16F, 18F whole series,SYNCMOS SM59Dxx / SM59Rxx full range.
Minipro programmer delivers outstanding performance in supporting nearly 13k + devices that other similar products like Topwin are not capable.
IC SUPPORT LIST
http://www.autoelectric.cn/minipro/MiniProSupportList.txt
Download the IDE version 6.10 from :
http://www.autoelectric.cn/minipro/minipro_setup.rar
Always download the latest version as the list of support ICs is updated frequently.
Start the installation file by double clicking MiniProV610setup.exe application.
You can leave it to default location or browse to a preferred one.


Click on INSTALL to confirm USB Driver installation.

Click “Install this driver software anyway “ to bypass Windows verification.

Click FINISH to complete the installation.

Now connect the Hardware unit to the USB port .Under Device Manager you can see the device name as “MiniIProWdf” if the installation went through smoothly.

You’re all set to start the Programming.Open the IDE & if you get Reflash Firmware window , just click on Tools à Reflash Firmware from the IDE to install the latest updates
Obviously you should connect the hardware to the USB & your internet connection should be ON for this process.If there is no access to internet the Reflash Firmware window appears again.


Once the Reflash is successful , click on the “Cancel” button. (Yes it is not OK button ,it is Cancel button) !!
We shall see how to program PIC 16F877A IC .
Under Select IC à click Search and Select IC.

Under Type select MCU/MPU & start typing “PIC16F” inside the ‘ search device’ space bar.All the related PIC ICs will be displayed on the right pane.Select the target IC as , PIC16F877A.
Click on Select.

Ensure that 40 pin adapter is selected on top .Later we’ll see how to work with ICSP.

Click on “Information” button at the right top corner to learn how to place the chip on the ZIF socket.According to the diagram place the IC on the socket , pin 1 is always near the handle.

Lock the handle by pressing it down.
By clicking under DEVICE ,you can perform initial check for the IC .Blank check can be done & if you want to erase the chip , click ERASE

Following is the screenshot of Chip Erase function :

To load the HEX file on to the buffer click File à Open & browse to the location where you’ve stored the HEX file that is to be fused on to the target chip.

Select the HEX file & click Open.

The File Load Options should be in the File format “INTEL HEX” .The Binary option is to load a “bin” file.Here confirm INTEL HEX is selected.
 .
.
Under DEVICE click on PROGRAM to start fusing the HEX file.

On the next Chip Program window click “Program”.


You can see PROGRAM SUCCESSFUL if the fusing is finished.
To make a copy of a chip say, EPROM 27C256 following is the method :
Select Device as 27c256 using Search Device bar.

Click on the Information button & place the Master IC on to the ZIF socket as per the diagram.

Ensure that the VPP Voltage at the bottom of the screen is selected according to programming voltage of the chip (mostly it is 13.5 or 12v)

Click the “R “ button to READ the chip to the buffer.

Now remove the MASTER chip from the ZIF socket & place the SLAVE IC .This IC should be a fresh blank one or erased one under UV light.
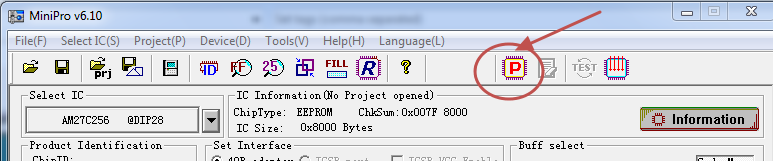
Click on the “P” button on the top to start copying the data on the buffer to the chip.

Same way you can make copy of PIC ,AVR or 8051 Microcontrollers.Remember that , if the source IC is previously LOCKED ,you can’t make a copy.
To program SMD ICs & other QUAD package ICs you can buy Converters on which this IC is mounted.

In the next post we shall review the ICSP model of MINIPRO 866.
Watch this demo video :
For availabilty of this programmer contact :


hey ; i try to download the MiniPro software from the link but i can not
any suggestions
Try this link :
http://www.alselectro.com/files/minipro_setup.rar