The HM-10 BLE Wireless Module-Original is a readily available Bluetooth 4.0 module, which can configure as either Master or slave.
This module is used for establishing wireless data communication. The module is designed by using the Texas Instruments CC2541 Bluetooth low energy(BLE) System on Chip (SoC). You can use it simply for a serial port replacement to establish connection between MCU & your embedded project
It is fully configurable by a rich and well documented AT command-set and allows transparent data communication via serial UART (default baud rate 9600 bps).
The Bluetooth 4.0 HM-10 is basically a breakout board for cc2541, it broke out the LED pins, RX/TX and also adding the voltage regulator that regular 5v to 3.3 v.
Clones available in market have on board only single crystal and the Firmware of clones support limited AT commands.Clones are mostly named as MLT-BT05
Pin Description:
- STATE: state test pins, connected to an internal LED, generally keep it unconnected.
- BRK: break connect, it means breaking the Bluetooth connection, generally keep it unconnected.
- VCC: positive pole of the power source.
- GND: Ground.
- TXD: serial interface, transmitting terminal.
- RXD: serial interface, receiving terminal.
- For testing AT Commands we need an USB-TTL module built on CP2102 ic.
- Connection between HM10 and USB-TTL is shown below :
Tx of HM10 can be connected directly to Rx of USB-TTL.
Rx of HM10 to be connected through a level shifter to Tx of USB-TTL. A 1k in series and 2k2 across to Gnd is a simple level shifter.
HM10 can be supplied power 5v , as there is on board 3.3v regulator.
Connect the USB –TTL to PC and note the COM port allotted.
We require a TERMINAL software to test AT commands.
The HM10 module do not wait for a Carriage Return .So Putty terminal cannot be used.We use COOLTERM terminal in LINE MODE.
https://freeware.the-meiers.org/CoolTermWin.zip
Install COOLTERM software.
Open OPTIONS
Under Serial port select the COM port of USB-TTL , Baud Rate 9600, 8N1
Under TERMINAL setting select LINE MODE.
This allows sending AT commands as a single packet.
Click on CONNECT.
Typing AT on the line mode gets an OK reply from HM10.
To get the MAC address of HM10
AT+ADDR?
Notice the usage of ? for a Query command.
For assignment we do not use =
Just feed in the value after AT command.
For e.g to change the password from default 000000
AT+PASS123456
After PASS we do not use = symbol.Just provide the value.
AT+NAME?
Returns the default name of the module as HMSoft.
To change name AT+NAMEmyHM10
ROLE of HM10 by default is SLAVE.
To change to MASTER mode
AT+ROLE1
On Master mode the HM10 will not broadcast its name.Pairing can be initiated only from a MASTER.
AT+BAUD?
returns 0.
By default HM10 is in AUTO BAUD mode 0.
You need to set the baud rate by
AT+BAUD9600
AT+POWE?
Returns the transmit power of module which is o dbm by default.
To restart the module
AT+RESET
There is an LED connected to PIO1 on board whish shows the STATUS.
Default value is 0 which makes LED blink 500ms ON/OFF when in disconnected mode.
When paired , the LED goes ON steadily.
Now let us pair this module from an ANDROID phone which will be Master.
Install the application BLE TERMINAL.
Open the application and Scan for devices.
HM10 appears as HMSoft.
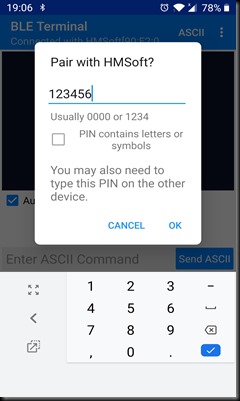
Touch on this HMSoft and provide the password to pair.
Once paired the LED on HM10 glows steadily.
Now you can type some characters on phone which is received at HM10 Coolterm.
From Coolterm window you can type and receive on phone BLE Terminal.
To DISCONNECT you can touch on the disconnect.
At the COOLTERM you get the NOTIFICATION.
VIDEO TUTORIALS :


