Category: Friendly ARM Mini2440


In this post I shall demonstrate the ways of developing programs for mini2440 using Code Blocks.

Code Blocks is a free cross platform IDE with powerful features.

Install Code Blocks using the Ubuntu Software Center.Just type code blocks in the search box & click install.

After installation ,the Code Blocks icon appears on the Launch bar.

    Ubuntu Software Center_003

Click the Icon to fire Up Code Blocks.To start a new program Click Create New Project button.

code_blocks


Select  Console Application ,click Go button & in the next window select C as the language.

 console_app   select_c

Click Next & provide a name for your project,e.g., welcome.

  Console application_026 

Select the Compiler as “GNU ARM GCC Compiler”.

  select_compiler 

Click Next to see the Workspace window.To the left hand side under Projects tab you can see the project name “welcome” & if you expand Sources you can see  main.c file automatically created.Double click this main.c file.    

       main.c

By default , a sample Hello world program is presented.

As we are cross compiling the program for ARM platform ,we’ve to do the Compiler settings as below:

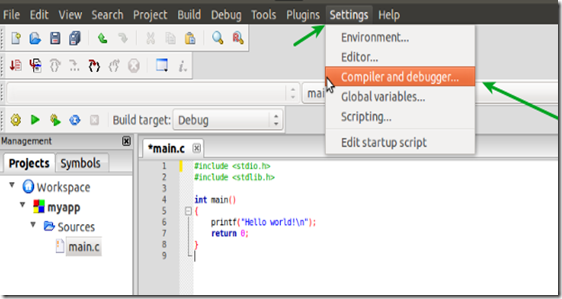
Click Settings –> Compiler and Debugger

comp_set

Under selected compiler make sure that the entry is GNU ARM GCC Compiler.

Now select the Tab Toolchainexecutables.

    Compiler and debugger settings_045

This part is the most important part of Compiler settings.Please take care to select as per screenshot below :

       Compiler and debugger settings

The Compiler’s installation directory is /opt/FriendlyARM/toolschain/4.4.3/

For installation procedure of cross compiler read the previous post here.

Under the Program Files tab make sure the settings are as below :

                   C compiler          :   arm-none-linux-gnueabi-gcc-4.4.3

                 C++ compiler       :  arm-none-linux-gnueabi-c++

Linker for dynamic libs       : arm-none-linux-gnueabi-g++

Linker for static libs            : arm-none-linux-gnueabi-ar

                  Debugger            : gdb

               Make Program     : make

To select the path click on the eclipses ..  & browse to the directory

            /opt/FriendlyARM/toolschain/4.4.3/bin

Inside this bin directory you see all the require Program files.Select as per list above.

path2

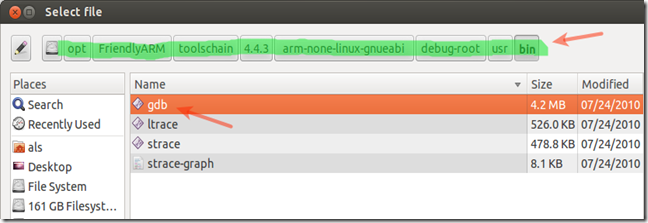
The Debugger used is gdb & the path is

/opt/FriendlyARM/toolschain/4.4.3/arm-none-linux-gnueabi/debug-root/usr/bin

debug_path

Click OK to arrive at workspace.

Now feed the code as below ,just to print out message “Welcome to FriendlyARM…!” 5 times:

    appln_1

Click File –> Save All & then click Build –>Build

     build

Note that if you select Build and Run you’ll get error, as this program is intended to run on ARM platform & not on your x86 PC.

              run_error

Just click on Build.The bin file is ready to be transferred on to the target ARM device,mini2440.

By default the result file is stored in your Home.

Open File system ,browse to /Home/welcome/bin/Debug

                    binfile

There you find your final output executable bin file “welcome”.

To transfer this file on to the target device,use FTP method.Open the Linux Terminal & change directory to the folder where your final output file exists.Here it is 

/Home/welcome/bin/Debug.

To start ftp type  ftp 192.168.1.230  which is the IP ADDRESS of our target device MINI2440.

                  start_ftp

Type in the Name as plg  & password also as plg.

Now  the ftp> prompt appears where you type bin to set the type of file to be transferred.

Type > put welcome

to transfer the file welcome on to mini2440.

            ftp_3

Now it is time to test you program on the Target device.Open up the PuTTY Terminal

(Read the setup procedure here in  previous post setup).

& change directory to /home/plg

Under  plg directory is the welcome file you transferred from PC.

Type  # chmod +x welcome

to give Execute Permission to the welcome file.

     execute_1

Now type # ./welcome 

  ( dotforward slash filename ).

Congrats!! You see the result of welcome program.Instead of executing this within PuTTY terminal you can do this on the Target device by opening the terminal built in it.


NFS – Network File System allows a server to share files with clients.In our case host PC is the server & mini2440 Friendly Arm device is the client.

NFS is similar to SAMBA of Windows machines.Using NFS a folder in host PC can be accessed from within the mini2440 device.

To set up NFS server on host PC you need to edit configuration file called exports which is in /etc/exports.

This file contains a list of entries indicating a volume that is shared & how it is shared.It has the access control list for file systems which may be exported to clients.

To start with install the NFS service by typing in Terminal following command :    sudo apt-get install nfs-kernel-server

  install_1

            Provide the super user password to start installation.

           install_2

    Now edit the file /etc/exports

          gedit_1

The exports file will open up.Add the following line to the top of file.

 /opt/FriendlyARM/mini2440/examples 192.168.1.*(rw,no_root_squash)

& save it.

             etc_export

Here /opt/FriendlyARM/mini2440/examples is the folder on host PC you want to share with mini2440.

192.168.1.* is the IP address of mini2440. (open PuTTY terminal & type ifconfig to know the IP address.)

(rw,no_root_squash)  –   rw is Read/Write access enable ,                            no_root_squash –> client machine will have same level of access to  files  on  system as root on server.

Now change mode to give Read,Write,Execute Permission to the folder /opt/FriendlyARM/mini2440/examples  by typing

    $ sudo chmod 777 /opt/FriendlyARM/mini2440/examples

            chmod_1

Disable any firewall by issuing  : $sudo ufw disable

            firewall

Now you can start the NFS service on PC by typing

  $ sudo service nfs-kernel-server start

      nfs_start

To verify that NFS is running query the portmapper by command

      rpcinfo –p

You should see the services like  portmapper,nfs ,mountd,..

On Client (mini2440) side mount the file system nfs by typing following command in PuTTY Terminal

mount –t nfs 192.168.1.100:/opt/FriendlyARM/mini2440/examples /mnt/ –o udp,nolock

client_1

-t is the type of file system we are mounting (nfs).

192.168.1.100 is the IP address of host PC.

:/opt/FriendlyARM/mini2440/examples  is the folder on host PC you want to share with mini2440

/mnt    -> is the folder on mini2440 you want to link to /opt/FriendlyARM/mini2440/examples  folder on PC.

Note the space between /examples & /mnt & a space after mnt/ & before –o.

udp  -> instructs the NFS mount to use the UDP protocol (& not TCP protocol).

nolock  -> disables file locking

Now create a directory say , mynfs_files within examples folder.

mkdir_1

Go to PuTTY Terminal & check up the /mnt folder.There you find the folder we created in PC.

MYNFS_076

Remove the folder we created by issuing command rmdir mynfs_files from within Linux Terminal

rmdir_nfs

Now you can see in PuTTY terminal the same folder is deleted as well in /mnt folder of mini2440 device.

nfs_del

To execute any file you can issue the command  ./binfilename as seen below

execute

To stop the NFS service ,in Linus terminal type

   $ sudo service nfs-kernel-server stop

     stop_nfs

In PuTTY terminal you can issue command  # umount –t /mnt/

to stop NFS.

Now if you try to access /mnt folder you’ll get server not responding error.

         NFS_STOP

You can also boot mini2440 via NFS. Here NFS is set as root file system to boot mini2440.This is an advanced option & discussed in later posts.


In the previous post we saw the initial set up procedure & how to unTar the example files.

In this post we shall see the ways of loading these files on to mini2440 device & executing it.

I assume that you are ready with the connections as described in previous post & your mini2440 is switched ON.Keep open both the Linux Terminal & the PuTTY Terminal. 

Here is the screen shot of both the Terminals open.     

2_TERMINALS

             PuTTY Terminal                                             Linux Terminal

In the Linux Terminal go to root by typing cd /.

Then  change directory to mini2440 under /opt folder.

  cd /opt/FriendlyARM/mini2440

Inside this is the examples folder which we extracted (details in previous post).

Type cd examples

& then   ls to list out the contents.The “examples” folder contains many test programs.

First we shall test the hello example.

Change directory to hello  by typing

    cd hello

4.make_hello

Inside this hello folder are the hello.c & Makefile.

Type make hello

Now a command is automatically issued by the compiler to generate an executable binary file called hello from the file hello.c which is a C code file.

You can see the command in action as :

   arm-linux-gcc –o hello hello.c

Instead of giving a make command you can feed in the above command directly.Note the space after gcc & then hyphen ,letter o , space, hello is the name of resulting bin file & hello.c is the source file to be compiled.

   hello_056

Issue a ls command to list out the contents of hello folder.You can see a bin file hello created.

  hello_057

To read out the C code in hello.c file use gedit. 

    sudo gedit hello.c

   hello.c

The compiled hello bin file has to be loaded on to the mini2440 device for execution.

There are 3 ways of achieving this.

1.Using a Pen drive or SDCard.

2.Using File Transfer Protocol FTP method.

3. Using NFS – Network File System service.We shall see NFS in detail in next post.

The 1st & 2nd method are described here. 

Using Pen drive / SDcard method.

Plug in a pen drive to the host PC.Copy the hello executable file we compiled inside the

/opt/FriendlyARM/mini2440/examples/hello folder.

From the Linux Terminal issue following commands to copy the file :

  # mount /dev/sda1 /mnt    ; to mount pen drive on host PC.

# cp hello /mnt         ; copy hello bin file to pendrive

# umount /mnt        ; uninstall pendrive

Remove the pen drive from host PC & plug in to the mini2440 USB host port found at the right side top (above the SDCARD Socket).

It is automatically mounted to /udisk directory.

From PuTTY terminal type

  # cd /udisk

to change directory to Pendrive.To execute the file issue following command

# ./hello

Note a  “.”  followed by a forward slash / & then the bin file name.

2. FTP method

From the Linux Terminal type ftp 192.168.1.230

192.168.1.230 is the IP  address of the mini2440.FTP always works with a password.

When prompted for name, type in plg & the password is also plg.Be sure to reside in the folder   /opt/FriendlyARM/mini2440/examples/hello .

  ftp_1

Now you get the ftp prompt.

Type ftp> bin

  to set the configuration of document format.

Now type  ftp> put hello

to transfer hello file to a folder called plg which resides inside /home folder of our Friendly ARM device..

put_hello

Now the file is transferred to the target device mini2440.

Type ftp> by

to log out of FTP.

 ftp_by

From within the PuTTY terminal type ls to list out the contents.

Change directory to /home/plg where we transferred the bin file.

inside_plg 

Inside the plg folder you can see the hello bin file we transferred from the host PC.

Before executing this file we have to change the execute permission scope of the hello file, by typing

   # chmod +x hello

execute_hello

Now issue the command  ./hello  to see the result “hello,FriendlyARM

Instead of working from within the PuTTY terminal you can directly open the Terminal on the mini2440 device & issue above commands.It’s all one & the same.PuTTY terminal is nothing but the terminal of device itself.  


Before starting up with programming mini2440 you need the following accessories.

1. USB A-B cable – 2 no. 

2. RJ-45 Ethernet cable.

3. USB-UART board with RS232 Female-Female cable

4. 5V,2Amp  adapter.

Following is the rough sketch up of connections to be made.

         MINI_SETUP

Connect the USB-UART board to the RS232 9 pin D connector of mini2440 using the Female – Female RS232 cable. The other end of USB-UART board  is connected to one of the USB ports of your PC using the A-B cable.


Connect the 5V/2A adapter pin t the power socket of mini2440 which is at the lower left end above the S1 power switch.


Connect the RJ45 cable to the Ethernet port of mini2440 found just above the 9pin D connector.The other end is connected to one of the RJ45 sockets of the Router (mine is Linksys Router with built in ADSL Modem).Please note that already your PC’s Ethernet port is connected to this Router to provide Internet access.


The USB – B connector found at the top of mini2440 is connected to another USB port of your PC.

To establish communication between your Host PC & the Friendly mini2440 use the Terminal software PuTTY.This is similar to the HyperTerminal in Windows platform.


To install putty in Ubuntu 12.10, open the Terminal and enter the following command

                sudo apt-get install putty


Once putty has been installed, open your Dash (press Win/super key) and type Putty.
The PuTTY SSH Client icon will appear in the search results. Launch PuTTY SSH Client by clicking on the icon.

PUTTY

Lock PuTTY SSH Client to your launcher by selecting Lock to Launcher.

Power ON the mini2440 device by sliding switch S1 to left (away from the board).

Fire on PuTTY terminal.To configure PuTTY to communicate with mini2440 , you should know the port to which the device is allotted.In Windows it is called like COM1, COM2,,..

In Linux it is like ttyUSB0  , ttySo,…

Under Linux Terminal type in following command (we are going to use both Linux terminal & PuTTY terminal.Be sure to understand which terminal to type in the command.)

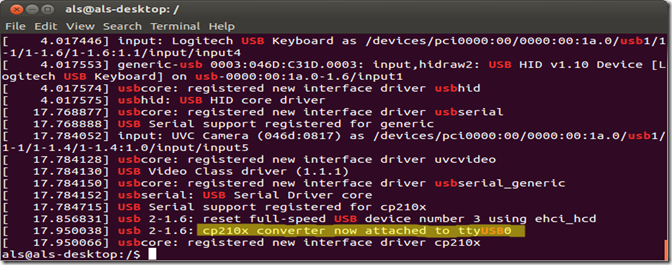
              dmesg | grep –i usb

to read out the information of devices connected to USB ports of the host PC.

       DMESG

As you see in the screenshot, the USB-UART board we are using to connect mini2440 to PC is recognized & allotted ttyUSB0 .As the conversion board is using cp2102 IC it is displayed as “cp210x converter attached to ttyUSB0 “.

dmesg2 

Fire up PuTTY & under configuration window select Serial as the connection type.Enter speed as 115200 & under serial line type in /dev/ttyUSB0. Note that it is USB zero & not letter O.You can save the settings by providing a name,say arm2.

       putty_config

Now select the saved session “arm2” & click on Load & then Open.

A black blank PuTTY terminal window opens up.Switch off & then again switch ON the mini2440 device to see the action as below:

            putty1

           putty2

At the bottom of terminal screen finally you get the prompt as below:

    -dev-ttyUSB0 - PuTTY_016

To know the IP address of the mini2440 device type ifconfig

dmesg_3

The IP address is 192.168.1.230 ,as seen above.

Now we shall see the Set Up to start loading example programs on to the mini2440 device.

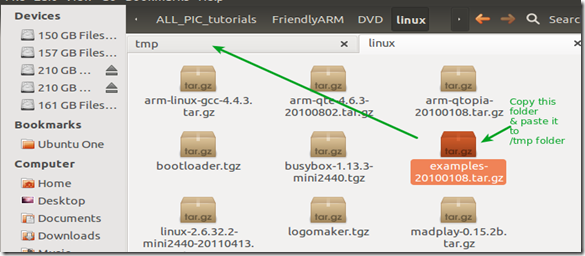
From the DVD that is supplied along with mini2440 ,go to the /linux folder  & copy

examples-20100108.tar.gz file to  /tmp folder of file system.

   1.example_to_tmp

Now under Linux Terminal change directory to  /tmp.

Type in following command to UnTar the example files.

   sudo tar xvzf examples-20100108.tar.gz –C /

Note the Space after filename .tar.gz & the usage of capital letter C followed by space & then a forward slash / .

         2.UNTAR_TMP

A folder called examples is created under /opt/FriendlyARM/mini2440

into which all the example c code files along with make files are extracted.

      3.UNTAR_eg1


Now you are all set to start loading & testing programs on the mini2440 device.


A compiler is a program that turns source code into executable code. Like all programs, a compiler runs on a specific type of computer, and the new programs it generates also run on a specific type of computer.

The computer on which the  compiler runs on is called the host, and the computer the new programs run on is called the target. When the host and target are the same type of machine, the compiler is a native compiler. When the host and target are different, the compiler is a cross compiler.

In our case Friendly ARM is the Target device & PC/Laptop is the Host.We’ve to install the Cross Compiler on the Host to enable deploying programs on to the target FriendlyARM device.In this post I shall explain the process of cross compiler installation on a Linux (Ubuntu 12.04) running Host Computer.

To start with copy the Linux directory from the DVD supplied along with the Friendly ARM device.Paste it to the /tmp  directory of File system.

              copyto_tmp

Open up the Terminal type cd /  & go to root.Change directory to /tmp/linux by typing

cd /tmp/linux

              cd_tmp

Type  ls command to list out the contents.

arm-linux-gcc-4.4.3.tar.gz  is the file we’ve to unTar.

            TAR

Enter the following command to untar the linux-gcc file.

                sudo_tar

Use sudo to be a super user .Also note the capital letter C , a space after it & a forward slash /

Type in your super user password.

The command line arguments we use with tar command are  x , v  , z , & f.

        x   is to extract/restore contents of tar file.

        v  is Verbose output i.e, to display the files being restored from tar file

        z  is to use zip/gzip to read or restore from tar file.

        f  is to specify the filename used to tar out from

This command will extract arm-linux-gcc to the directory    /opt/FriendlyArm/toolschain/4.4.3

     extaract

To run the compiler you’ve to add the PATH to the compiler environment variable of the system.

Change directory to Root  cd /    & then go to bin directory by typing

cd /opt/FriendlyArm/4.4.3/bin

       bash_edit1

We’ve to edit the hidden system file .bashrc ( a  ‘ . ‘  indicates that it is a hidden file) & add the PATH at the end of file.

To do that type    sudo gedit /root/.bashrc

Type your super user password.

.bashrc file will open up.Scroll down to the end of file & add the path as

   export PATH=$PATH:/opt/FriendlyArm/toolschain/4.4.3/bin

& save it.

     bash_edit2

To Restart shell ,type      source ~/.bashrc   or you’ve to logout & login back.

(Note the usage of  ~ for root )

    restart_shell

The Cross Compile environment has been successfully installed.

Type  echo $PATH   to verify the installation path.

         ECHO_PATH

Now type   arm-none-linux-gnueabi-cc –v

Note that the gnu compiler make use of EABI , the new Embedded Application Binary Interface.

The compilation process is perfect you will see the following screen.

       arm_linux

Now you are ready to cross compile your C code.


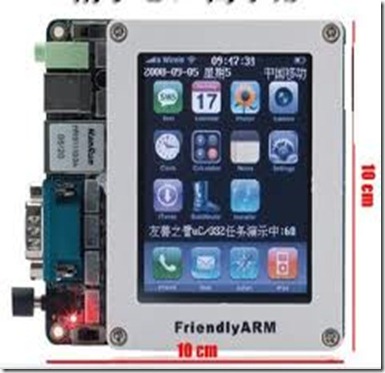
Friendly ARM Mini 2440 is a Single-Board Computer(SBC) built on 400 MHz Samsung S3C2440 ARM9 processor  & 3.5” Touch screen LCD is provided with mini 2440.

It has up to 256MB RAM & up to 1GB NAND Flash and 2 MB NOR Flash with BIOS.


farm2 


Image 2

Friendly Arm Mini2440 is factory preloaded with Linux Qtopia operating system.This post is intended to revive the operating system in case of non booting of device.

Mini2440 has a Flash NAND ROM of 1 GB &  2MB NOR alternate Bootloader.Top left is switch S2 for NOR/NAND boot selection.To the bottom left is the power ON/OFF switch S1.Slide this switch to left for power ON..

NAND flash is used in all removable memory cards because of fast write & erase operations (but slow random access).Because of NAND’s multiplexed command address & data bus it requires lesser number of pins for interface.

NOR flash memory has an advantage of fast Random access ability.It allows for Execute in place (XIP) capability which is often a requirement in Embedded applications.

Friendly Arm uses both types of flash memory.

Friendly ARM is capable of running 3 types of Operating system, Linux,Windows CE(Compact Edition 5.0 or 6.0) & Android.

Friendly Arm boards are available with 1GB Flash memory.Next to SD socket on mini2440 board you see Samsung NAND Flash chip.

                          Image 8

As seen in above picture,S92ALU16J7OTF102 IC is the NAND flash chip (1GB) which is the maximum available Flash memory for MINI2440.

K9K8G08U08 is NOR Flash IC.

In this post I shall demonstrate installation of Linux Qtopia on to NAND flash of Mini2440.

Mini 2440 comes preloaded with a SuperVivi bootloader in NOR flash.It is used to install Operating system on to NAND flash.SuperVivi is the BIOS for mini2440 & is used as a tool to download & burn OS image  to the Flash onboard.

Your Host Computer operating system may be Windows 7 /XP or Linux Ubuntu 12.04.It is easier to install Qtopia on FriendlyArm device from a Windows 7 running PC.Later we shall see how to develop programs in Linux Environment & load it to Mini2440.

From the DVD supplied along with the Friendly Arm collect the required software.

Go to    /images/linux  folder of DVD .

Or you can download it from my Skydrive here.

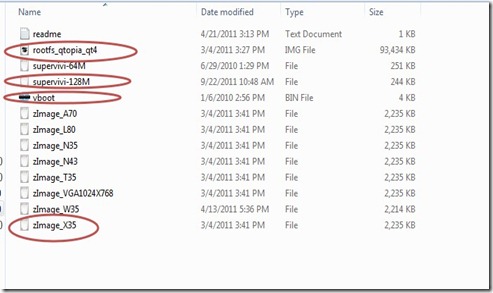
Copy the following software to a separate folder ,say mini2440 on Desktop :

1.  rootfs_qtopia_qt4   2. supervivi-128M   3. vboot  4. zImage_X35


Image 5

Keep S1 switch found at bottom left in OFF mode (slide to Right).

Connect the 5v/2A adapter pin to the power socket found above the S1 switch.

Connect the RS232 cable to the DB9 connector seen above the power socket.Generally an USB to UART board is used to connect this RS232 to USB of your PC.

Connect the USB-B (device USB) seen above the Ethernet connector to another USB port of your PC.Remember to use the USB cable supplied along with the device.I’ve wasted a whole day by using a cable bought  from market.USB download was not possible & finally using the USB cable  that came along with the device solved the problem.

Keep the S2 switch found above the left corner in NOR mode.(slide the switch to left).

Open up the Device Manager to confirm that USB-UART board used to connect DB9 of Friendly Arm to USB of PC is detected.If not detected,download the driver from here & install it.

Image 20


Now visit the download site of FriendlyArm      http://www.friendlyarm.net/downloads

Download the USB driver & DNW tool .


                              Image8

Take a look at the files & software we collected & stored at mini2440 folder on desktop

Image 21 

Unzip the downloaded driver file usb-downloaddr-setup_20090421.zip (1.49 MB) & double click on setup file.

Image9

Screenshots of driver installation are as below.

Image 9    Image 10


Open the Device Manager under the Control Panel.

Now power ON the FriendlyArm by sliding S1 switch to Left.

If the drivers are installed,you see Friendly Arm detected under “Universal Serial Bus Controllers”.

Image 7

We shall make use of a Terminal software to work with Supervivi BIOS .

Download Terminal software PuTTy from here.

You can also use Hyperterminal.But I prefer to use PuTTy as it is fast & reliable.

Open up PuTTy & in the welcome window do the settings as below :

1. Select Connection type as “Serial”.

2.Under Serial line enter the port number (in our case it is COM2).To know the port no. allotted ,open up Device manager & under Ports(Com&Lpt) you see the COM port number allotted to the USB-UART board we have used to connect DB9 of mini2440 to PC.

                     Image 6

3. Enter baud rate as 115200 under Speed.

                                 Image13


4. Save the settings by providing a name mini2440, so that you can load it latter.

5.Now load the saved setting by selecting mini2440 & clicking “Load”.

     A blank black window opens up.Click Enter to see the FriendlyArm BIOS setup under Putty terminal.

                      Image14

Now Unzip the downloaded DNW tool .Double click DNW

At the title bar you see USB:x indicating that USB is NOT ready for transfer of data.

 Image11  

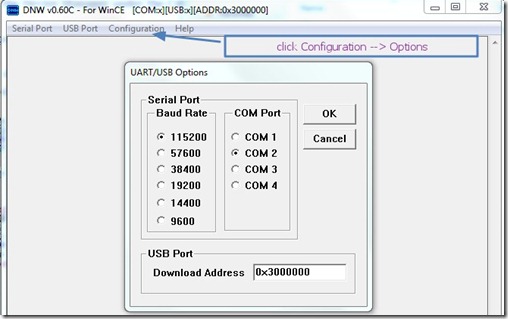
Click Configurations –> Options

Select COM port as COM2 (as seen in Device Manager) ,Baud Rate as 115200.

Download address should be 0x3000000.

Image12

Click Connect under Serial Port.If Drivers are installed properly

USB:OK along with COM2,115200 is displayed on the title bar.

Image15

If  USB:OK is not displayed ,check up the Device Manger for “FriendlyArm “ entry.Else you have to install the drivers again.

Caution : Remember to open the Putty terminal  first & then fire up DNW.If you keep open DNW & try to connect COM port through Putty,it will show error.

Here is the list of activities we’ve to do :

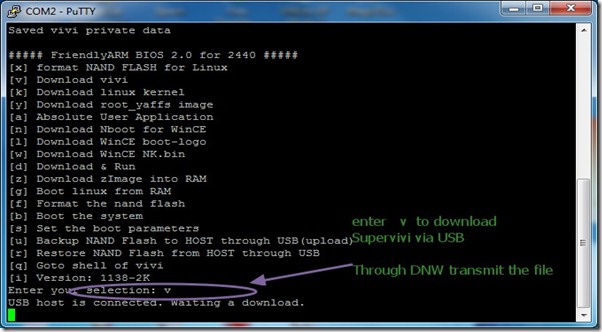
1. Press  x to Format NAND Flash.

2. Press v  to download Supervivi via USB. From DNW transmit supervivi_128m file.

3. Press k to  download the Linux Kernel. From DNW transmit zImage_x35.

4. Press  y to  download yaffs root image.From DNW transmit  rootfs_qtopia_qt4  image.


Type  x  to start Formatting the NAND flash.

Image22

Type  v  to download the Supervivi  file.Terminal will display “USB host connected.Waiting a download “.

Image23

From within DNW select USB Port –> Transmit –> Transmit & browse to the folder

mini2440 where we collected all files & software.Select supervivi_128M file & click OPEN

Image24


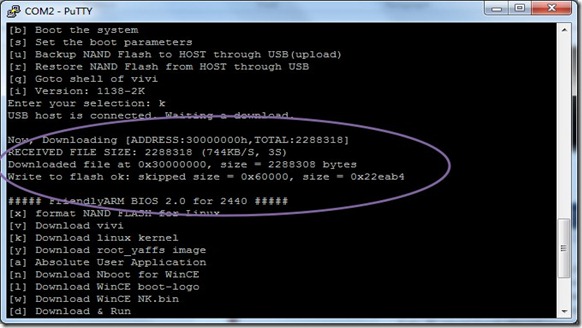
Image25

Now type  k to download the Linux Kernel.

Image26

From DNW click USB Port—> Transmit  –> Transmit & browse to select file zImage_X35.

Image27


Image 28

Type  y  to download the yaffs root image which is the file system for QTopia.

Image29

From DNW  select USB Port –> Transmit –> Transmit & browse to the image file rootfs_qtopia_qt4 in the mini2440 folder

Image31


Image 30


Now switch off the device by sliding S1 to right.

Slide switch S2 on top to NAND position (slide Right).

Power ON the device by sliding S1 to left position.

QTopia Linux will start booting on the device.