The MLX90614 from Melexis is an infrared thermometer for non-contact temperature measurements. Both the IR sensitive thermopile detector chip and the signal conditioning ASIC are integrated in the same TO-39 can.
Integrated into the MLX90614 are a low noise amplifier, 17-bit ADC and powerful DSP unit thus achieving high accuracy and resolution of the thermometer.
Factory calibrated in wide temperature range: -40 to 125°C for sensor temperature and -70 to 380°C for object temperature
SMBus ( I2C based) compatible digital interface for fast temperature readings and building sensor networks.
In this project we shall use the MLX90614 with OLED & ULTRASONIC sensor.Arduino NANO is used as controller.Calibration procedure for correct object temperature reading is also explained.
Before coding , we need to install the required libraries for Arduino.
Open Arduino IDE
Sketch –> Include Library –> Manage Libraries
Search for MLX and select ADAFRUIT MLX90614 Library to install.
Next search for GFX and install ADAFRUIT GFX Library , which is graphic support library for displays.
Finally search for SSD1306 and select ADAFRUIT SSD1306 to install.
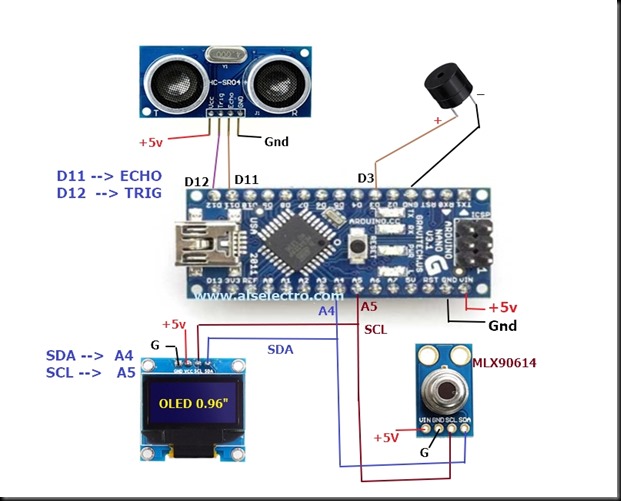
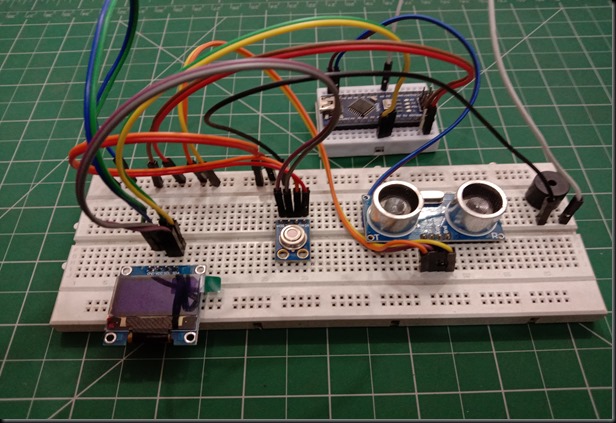
Connection details are as shown in image below.
Ultrasonic
TRIG –> D12
ECHO –> D11
OLED
SDA –> A4
SCL –> A5
MLX SENSOR
SDA –> A4
SCL – A5
A mini buzzer is connected to D3.
Vcc of OLED,MLX & Ultrasonic are connected to 5v of NANO
All GND pins are made common.
If you want you can use an external power source 5V 1 AMP at Vin of NANO.
As power consumption of OLED,MLX is very low , we can source power from NANO itself.
OLED & MLX are I2C devices , so they are connected to I2C pins of NANO ( SCL & SDA).
According to I2C address , respective device can be communicated.
CODE Explanation :
Starting with we include the libraries we installed for MLX & OLED.
An object named mlx is created from class Adafruit_MLX90614 from MLX library.
An object display is created from class Adafruit_SSD1306 from OLED library.Here we pass argument –1 , as there is no Reset pin in OLED.
Variables like roomTemp, objectTemp , stemp , threshold are created as Float
Ultrasonic echoPin is defined at D11 , trigPin at D12.
The Maximum & Minimum range of Ultrasonic are initiated as Integer variables.
Ultrasonic will sense the object distance and the Temperature reading from MLX will be initiated only when the Object is in between 15 and 25 cm.
Inside void setup()
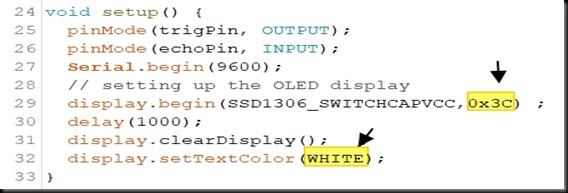
Trigger pin of Ultrasonic is declared as OUTPUT pin , Echo as INPUT pin.
OLED display is initiated using begin() function and the I2C address of OLED is passed as argument (0x3C).
setTextColor() function is used to pass argument WHITE which enables black background for OLED.
Inside loop() we generate a trigger pulse for Ultrasonic to generate a 40kHz burst.
The pulse reflected from object is calculated as width using pulseIn() function of Arduino.
Distance of the object is then calculated.
The object temperature in Celcius is read using MLX library function readObjectTempC()
& room temperature using function readAmbientTempC()
Initially the threshold value is set as 0.
After calibration we shall fix the correct threshold value.
Display settings for OLED by using functions setCursor() , display()
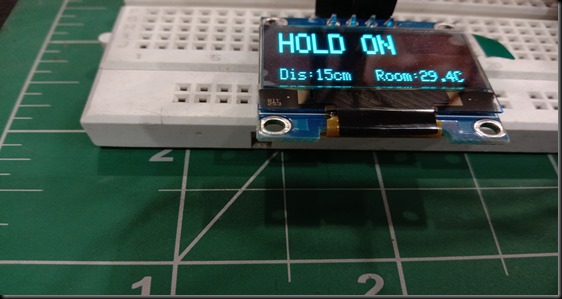
At the bottom of OLED we display the distance of target object in cm & then the Room temperature in celcius.
If distance of object is above maximum range ( we’ve set it as 25cm) , GET CLOSER is printed on display.
If distance of object is below minimum (15 cm) , TOO CLOSE is printed.
If the object is between 15 and 25 cm then HOLD ON is printed.
Till readcount is 5 (5 times we take reading and Average it) disptemp() is called.
Finally the object temperature is displayed.
If object temperature is above 37.5 celcius , play_alert() function is called.Here we use the tone()
Finally the compiled code is uploaded to NANO.
OLED display shows GET CLOSER initially and the object distance is displayed at the bottom along with room temperature.
If the object is near to sensor ( below 15 cm) , TOO CLOSE is displayed.
If the object is between 15cm and 25 cm , HOLD ON is displayed and blinks 5 times.
Reading is taken 5 times and averaged.
Forehead or Wrist is shown in front of sensor for taking reading of temperature.
The display shows 31.2 degree celcius.
We use an oral thermometer for calibration purpose.Using this meter under tongue , it shows 98.2 Fahrenheit.
Converting F to Celcius , it is 36.8 C
36.8 LESS 31.2 (shown by OLED initially) = 5.6
So we need to use this value as THRESHOLD.
Update the threshold value and then upload the code.
Now the display shows the correct temperature 36.9 C
Video tutorial :


sir can u send the full code of this project
How can I change into farenheat