This post is on displaying potentiometer reading from Arduino to Nextion display.
Open Nextion Editor and File –> New to create a project file with extension .hmi
Always keep your project files in a separate folder.
In the next screen select your Nextion model display , mine is 4024T032 which is 400 x 240 pixel & 3.2 inch size Basic model.Also select the direction of display as Horizontal.
Using Fonts Generator create a font file by selecting font size and font type.It is saved as .zi file.Click Yes to add font file to project.
The font file appears under font tab.
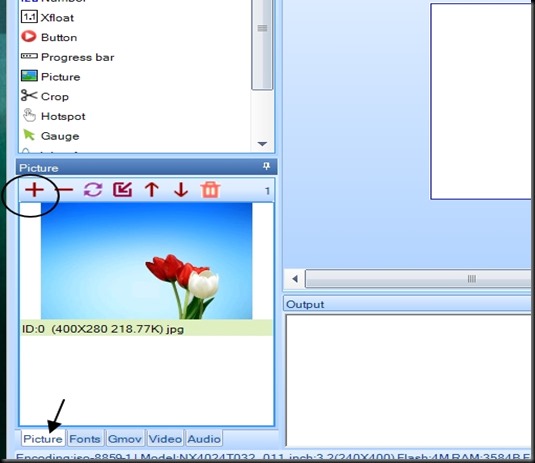
Next to Fonts tab you see a Picture tab.
Click on that and then click on the + symbol seen on top f this window.
Browse to the location of the background image you want to import.
Remember the image must match the resolution of the display model.Here mine is 400 x 240 , so I’ve converted the image to 400 x 240 pixels using IRFANVIEW Software.
Drag PICTURE tool from toolbox on to canvas or just click on Picture under tool box.
Picture component appears on canvas as p0 object name.
Click on that p0 , to modify attributes for object p0.
Against pic attribute click on browse and select the background picture from the list.
The back ground image appears on workspace canvas.
Click on SLIDER tool and then a NUMBER.
Slider appears as object h0 & number appears as object n0.
You may rename it from attribute section.But we shall leave it to default names.
Following is the attribute window for the object h0.
The mode by default is Horizontal , if required can be changed to Vertical.
Color of the slider by default is Green , by clicking against bc0 attribute and select color , you can change it. pc0 is the color of slider knob, Red by default & can be changed.
Set the maxvalue to 1023 , as Analog read of Arduino ranges from 0-1023.
n0 Number attributes
bc0 , pc0 to change color of number.
vscope can be changed from local to global. If global it is available for all pages and if you control it from Arduino through Serial , make it GLOBAL.
Click on DEBUG to start the Simulator.
Under simulator you can feed in the code to change value of n0 object.
n0.val=524 will change the n0 value to 524.
Close the Simulator.
Now to upload the .tft file (after Compile you get this file) on to Nextion , we use a USB-TTL device.
Connect Tx of Usb device to Rx of Nextion , Rx to Tx , Gnd to Gnd and Vcc to 5v.
Plug in usb device to pc and note the COM port allotted to it.
Click on UPLOAD,
Select COM port and baud rate & click GO.
To Arduino we have to upload the following sketch.
analogRead of A0 pin where pot pin is connected is assigned to a integer variable value.
A string n0.val is sent to serial along with this value .
The string is followed by 3 times 0xff hex value.This is the standard format Nextion will accept on its Serial.
Do not use any other Serial commands here.For e.g if you use Serial.println() , then Nextion will not display the value.
Once sketch is uploaded on to Arduino , connect Arduino to Nextion
Tx to Rx, Rx to Tx , 5v to 5v , Gnd to Gnd
Potentiometer Center pin to A0, one end of pot to +5v and other end to Gnd.
Now turning the potentiometer will vary the number on Display from 0 to 1023.
Now let us modify the Arduino code so that Slider moves according to number value.
Serial.print(“click n0,1);
click n0,1 means activate Press Event of object n0
upload this code on to Arduino.
Now on Nextion Editor click on n0 number object.
Under Touch Press Event feed in
h0.val=n0.val
The touch press event is activated by Arduin code , as if we were physically touching n0.
Now the event code is triggered where we assign value of slider to be same as value of number.
compile and upload the file to Nextion using USB-TTL.
Connect Nextion with Arduino nd see the result.
On varying the potentiometer the number value changes from 0 to 1023 .Accordingly the slider changes position.
VIDEO :


