Raspberry Pi Pico is a low-cost, high-performance microcontroller board with flexible digital interfaces.
Other Raspberry PI boards are SBC – Single Board Computer which requires an OS on a SD card.
But PICO is a Microcontroller like Arduino.
RPI boards do not have ANALOG inputs , PICO has 3 ANALOG inputs.
Designed on RP2040 IC (Dual-core Arm Cortex M0+ processor flexible clock running up to 133 MHz)
, this PICO board has 26 GPIO pins including 3 Analog Inputs.
As such RP2040 HAS 30 GPIO pins including 4 Analog inputs, but on board the user is offered with only 26 GPIO pins including 3 Analog Inputs.
- 264KB of SRAM, and 2MB of on-board Flash memory
- Castellated module allows soldering direct to carrier boards
- USB 1.1 with device and host support
- Low-power sleep and dormant modes
- Drag-and-drop programming using mass storage over USB
- 26 × multi-function GPIO pins
- 2 × SPI, 2 × I2C, 2 × UART, 3 × 12-bit ADC, 16 × controllable PWM channels
- Accurate clock and timer on-chip
- Temperature sensor inbuilt
- Accelerated floating-point libraries on-chip
- 8 × Programmable I/O (PIO) state machines for custom peripheral support
https://www.raspberrypi.org/products/raspberry-pi-pico/
PICO can be programmed with C / C++ SDK or MicroPython.
In this blog, we work with MicrPython.
To start with Press & Hold the BOOTSEL button on board and connect the USB to Windows PC.
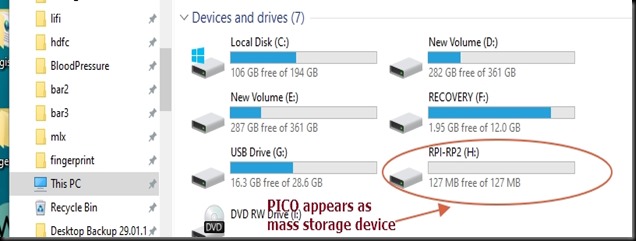
Release the BOOTSEL button to see PICO appear as a mass storage device RPI-RP2.
Open the Device Manager , you see PICO under Portable Devices as RPI-RP2.
Open the RP2 storage .
Double click on the INDEX.HTM file to visit the official PICO website.
Scroll down to click Getting started with MicroPython.
Here download the UF2 file , which is USB Flashing Format by Microsoft.
UF2 files can be opened and edited using a variety of Microsoft MakeCode editors.
To transfer a UF2 file to a microcontroller, developers plug their microcontroller into their PC’s USB drive. Their PC then recognizes the microcontroller as a FLASH DRIVE, allowing the developer to drag their UF2 file to the microcontroller and install their MakeCode program.
Drag and Drop the UF2 file on to RPI-RP2.
RPI-RP2 now disappears indicating Micropython installation is complete.
If you open the Device Manager , PICO appears as USB SERIAL DEVICE and a COM port is allotted.
For GUI interface we use THONNY PYTHON.
Download and install Thonny Python
Open Thonny Python
Under Tools –> Options
click INTERPRETER
Under Interpreter drop down select
MicroPython Raspberry Pi PICO and select the COM port allotted to PICO.
PICO is listed only in the newer version of Thonny.
Now click on the RED stop button to get the Interpreter CHEVERON 3 greater than symbol at the bottom.
You can try MicroPython commands here.
To blink the on board LED let us start the coding under Editor.
First import PIN Class from machine module.
Functions are called modules in Micropython.
Then import sleep class from utime module for delay.
Create an led object which takes 2 parameters.First is the GPIO PIN , which is 25 where the inbuilt led is connected.
Second parameter to declare this pin as OUTPUT.
Then starts the never ending loop
while True:
After the colon you get an indentation space automatically.
This is equal to braces in Micropython.
Here we toggle the led and provide a delay of 1 second.
Click File –> Save As
You get 2 options to save.
Select Raspberry Pi PICO to save the file.
Provide the filename as
main.py
Auto execution takes place only if the file name is main.py.
So it is a must to provide file name as main.py.
Click on the green RUN button
Now the LED on board blinks according to code.
To RESET the PICO back to factory condition
there is another UF2 file under Resetting Flash memory.
Download this nuke UF2 file.
Press hold the BOOTSEL button and connect the USB to pc.
Drag and drop the nuke UF2 file on to RPI-RP2 to erase flash memory back to factory condition.
There is no RESET button on PICO.
You can connect a RESET button between RUN and GND pin as shown below :
video :


![C2[3] C2[3]](https://alselectro.files.wordpress.com/2021/02/c23_thumb.gif?w=431&h=285)


When is the next version with Wi-Fi and Bluetooth going to be released??? Until then ESP32 will be hard to beat.
Love your posts.