In this post I shall demonstrate the ways of developing programs for mini2440 using Code Blocks.
Code Blocks is a free cross platform IDE with powerful features.
Install Code Blocks using the Ubuntu Software Center.Just type code blocks in the search box & click install.
After installation ,the Code Blocks icon appears on the Launch bar.
Click the Icon to fire Up Code Blocks.To start a new program Click Create New Project button.
Select Console Application ,click Go button & in the next window select C as the language.
Click Next & provide a name for your project,e.g., welcome.
Select the Compiler as “GNU ARM GCC Compiler”.
Click Next to see the Workspace window.To the left hand side under Projects tab you can see the project name “welcome” & if you expand Sources you can see main.c file automatically created.Double click this main.c file.
By default , a sample Hello world program is presented.
As we are cross compiling the program for ARM platform ,we’ve to do the Compiler settings as below:
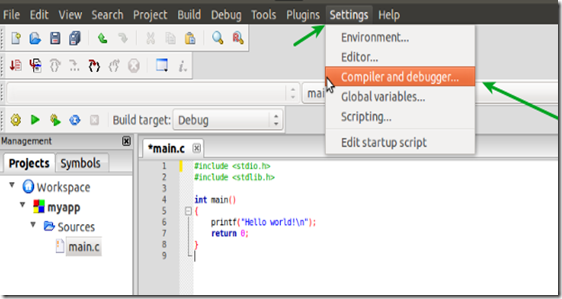
Click Settings –> Compiler and Debugger
Under selected compiler make sure that the entry is GNU ARM GCC Compiler.
Now select the Tab Toolchainexecutables.
This part is the most important part of Compiler settings.Please take care to select as per screenshot below :
The Compiler’s installation directory is /opt/FriendlyARM/toolschain/4.4.3/
For installation procedure of cross compiler read the previous post here.
Under the Program Files tab make sure the settings are as below :
C compiler : arm-none-linux-gnueabi-gcc-4.4.3
C++ compiler : arm-none-linux-gnueabi-c++
Linker for dynamic libs : arm-none-linux-gnueabi-g++
Linker for static libs : arm-none-linux-gnueabi-ar
Debugger : gdb
Make Program : make
To select the path click on the eclipses .. & browse to the directory
/opt/FriendlyARM/toolschain/4.4.3/bin
Inside this bin directory you see all the require Program files.Select as per list above.
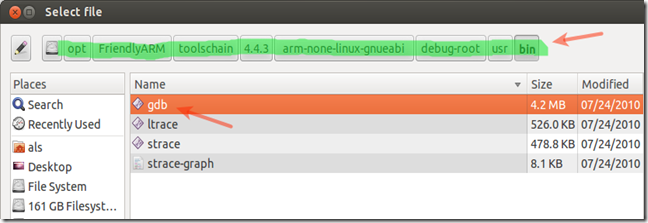
The Debugger used is gdb & the path is
/opt/FriendlyARM/toolschain/4.4.3/arm-none-linux-gnueabi/debug-root/usr/bin
Click OK to arrive at workspace.
Now feed the code as below ,just to print out message “Welcome to FriendlyARM…!” 5 times:
Click File –> Save All & then click Build –>Build
Note that if you select Build and Run you’ll get error, as this program is intended to run on ARM platform & not on your x86 PC.
Just click on Build.The bin file is ready to be transferred on to the target ARM device,mini2440.
By default the result file is stored in your Home.
Open File system ,browse to /Home/welcome/bin/Debug
There you find your final output executable bin file “welcome”.
To transfer this file on to the target device,use FTP method.Open the Linux Terminal & change directory to the folder where your final output file exists.Here it is
/Home/welcome/bin/Debug.
To start ftp type ftp 192.168.1.230 which is the IP ADDRESS of our target device MINI2440.
Type in the Name as plg & password also as plg.
Now the ftp> prompt appears where you type bin to set the type of file to be transferred.
Type > put welcome
to transfer the file welcome on to mini2440.
Now it is time to test you program on the Target device.Open up the PuTTY Terminal
(Read the setup procedure here in previous post setup).
& change directory to /home/plg
Under plg directory is the welcome file you transferred from PC.
Type # chmod +x welcome
to give Execute Permission to the welcome file.
Now type # ./welcome
( dot – forward slash – filename ).
Congrats!! You see the result of welcome program.Instead of executing this within PuTTY terminal you can do this on the Target device by opening the terminal built in it.


Congratulation, it is more a great tutorial, thank you!
This is what I looked for. I try to cross compile from Linux PC to Raspberry PI with GUI, Web server, I2C connections to relay cards. Thank you a lot for your tutorial.