
WEMOS D1 is a WIFI development board based on ESP8266 12E. The functioning is similar to that of NODEMCU , except that the hardware is built resembling Arduino UNO.
The D1 board can be configured to work on Arduino environment using BOARDS MANAGER.
So,its not necessary to use a separate Arduino board , the D1 itself can be programmed on Arduino IDE.This is handy in using with IOT projects. Further many Arduino SHIELDs are compatible with the D1 board.
Different versions of D1 boards are available in the market R1 , R2 , MINI
As the name implies D1 Mini is a smaller version
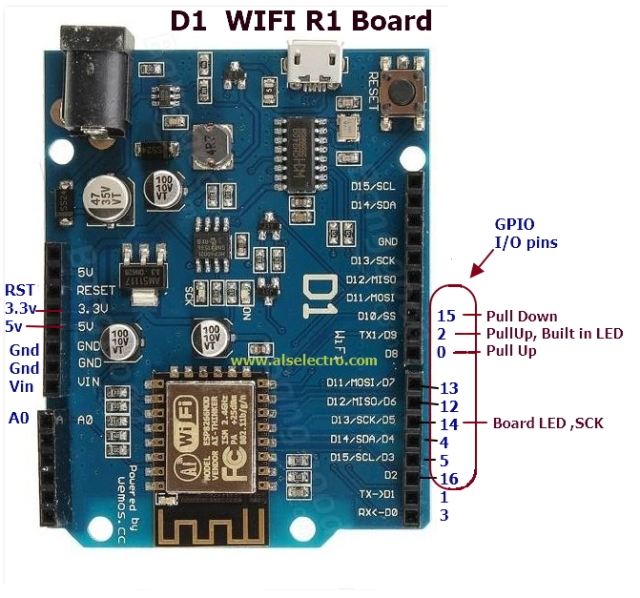
R1 , R2 boards look like Arduino UNO board ,but version is not printed on board. On some boards WEMOS D1is printed , as the ESP12 chip is manufactured by WEMOS.
In some other boards it is printed just D1 ,where the ESP12 chip is that of AI Thinker.
As the ESP12 chip has only one ANALOG pin , on board there is only A0 & other analog pins are dummy .


Use a MicroUSB cable to connect D1 with PC. Make sure that the cable is capable of handling both Data & power (some of the mobile cables can handle only power & not data) .
Open the DEVICE MANAGER & note the COM PORT allotted to the module.
As the serial chip used on D1 is CH340 , you need to install the corresponding drivers.

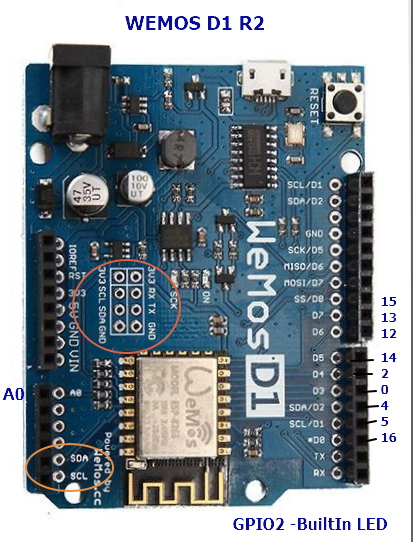
PIN CONFIGURATION
Following is the pin configuration of R2 typeD1 Module.Note the changes in GPIO Pin position.
Open the Arduino IDE & select this COM port.
From TOOLS —> BOARDS —> BOARDS MANAGER install the package for ESP8266.
Prior to this , you need to provide the link from where the Boards manager will look for the package.
To do this copy the following Link
http://arduino.esp8266.com/stable/package_esp8266com_index.json
Go to FILE –> PREFERENCES on Arduino IDE
Paste the link against the Additional Boards Manager URLs ,seen at the bottom of preferences screen & click OK.

Now open the TOOLS –> BOARDS –> BOARDS MANAGER

Search for ESP8266
Now you will find the package from ESP8266 Community.
Select the latest version from drop down & install it.
It takes a while & requires internet connection.

Once the package is installed ,you can see the list of boards under TOOLS –> BOARDS
Select the board as WEMOS D1 R1.
Select UPLOAD speed as 115200 &Programmer as USBASP

Now open the File –> Examples –> Basics –> BLINK sketch
No need to modify the sketch ,as we’re going to blink the built in LED (on the ESP chip , there is another LED on board which is mapped to pin14)
Click on UPLOAD

On some PCs you get a compile error ,stating that the file is being used by another process.
On some forums ,it is mentioned that the board is Duplicate .Its not the case, the reason is that some Antivirus program like McAfee does not allow the compilation process.
Open the Antivirus dashboard & TURN OFF the REAL TIME SCANNING for some time


You can also configure the Antivirus settings for an EXCEPTION to Arduino programs.
Now Upload the sketch.

Once the code is uploaded, you can see the built in LED blinking on the chip
Next code is a WIFI scanner which scans for nearby SSIDs & display the names of WIFInetworks with RSSI signal power &encryption mode.
For this we include the Header file ESP8266WiFi.h
This is installed along with the Boards Manager & is a very powerful library.
You can get more information on this library from here :
https://alselectro.wordpress.com/2016/11/29/esp8266-wifi-library-on-arduino-ide/
Many useful Functions are there for this WiFi library.
WiFi.mode (WIFI_STA);
The mode function of library is used to set the D1 board in STATION mode.
WiFi.scanNetworks();
scanNetworks function scans for nearby SSIDs & the result is an integer (number of surrounding WiFis) which is stored in a variable n
Then we print the SSID name,RSSI signal strength ( the lower the negative dB the stronger the signal), & Encryption mode (a * indicates SSID is password protected)
—————————————–
// D1 ESP8266 WiFi scanner
# include “ESP8266WiFi.h”
void setup () {
Serial . begin ( 9600 );
// set WiFi to station mode and disconnect from previous connection
WiFi.mode (WIFI_STA) ;
WiFi.disconnect ();
delay ( 100 );
}
void loop () {
Serial . println ( “Start Scanning ..” );
// scan for nearby WiFi SSIDs & save their number into n
int n = WiFi.scanNetworks ();
// in case no Network found , print info
if (n == 0 ) {
Serial . println ( “No SSIDs nearby seen…” );
}
else {
Serial . print (n);
Serial . println ( “WiFi network SSIDs nearby ….” );
// list all WiFi networks nearby
// name, signal strength and security method
for ( int i = 0 ; i <n; ++ i)
{
Serial . print (i + 1 );
Serial . print ( “:” );
Serial . print ( WiFi.SSID(i));
Serial . print ( “(” );
Serial .print ( WiFi.RSSI(i));
Serial . print ( “)” );
Serial . println (( WiFi.encryptionType (i) == ENC_TYPE_NONE)?”” : “*” );
delay ( 10 );
}
}
// Exit
Serial . println ( “” );
// pause for 15 seconds before new scan
delay ( 15000 );
}
———————————–


Support VIDEO:


It looks like Wemos now called Lolin (the name change happened April 25, 2017) is no longer selling this board in their official store. I guess they are focusing on the smaller D1 mini and D1 mini pro.